


Teach letter formation as a movement, not a picture. Show the child where each letter starts, which way the pencil travels and where it stops, then have them trace it, copy it and write it from memory in short sessions spread across the week. Watch them while they write, because a letter can look right on the page and still have been made the wrong way.
Why the movement matters more than the finished shape
A child who draws an o clockwise from the bottom, or builds an h out of two separate sticks, can still produce a letter that looks fine. The trouble shows up later. Once children need to write quickly, join letters or keep up with the class, a letter made the wrong way slows them down, drifts out of shape and is hard to unlearn.
There is a bigger reason too. Handwriting researcher Steve Graham explains that when letter formation still takes conscious thought, that effort crowds out the thinking children need for composing: ideas, sentences, spelling. As handwriting becomes automatic, attention is freed for the writing itself. He also points to nearly a century of studies showing that teaching handwriting directly improves both legibility and speed.
That is why curriculum documents talk about letter formation in terms of direction, not just appearance. England’s National Curriculum asks Year 1 pupils to “begin to form lower-case letters in the correct direction, starting and finishing in the right place.” The NSW Department of Education’s guide for parents builds every letter around a starting dot for the same reason.
The three things to teach for every letter
For any letter, a child needs to know three things, and you can check each one by watching.
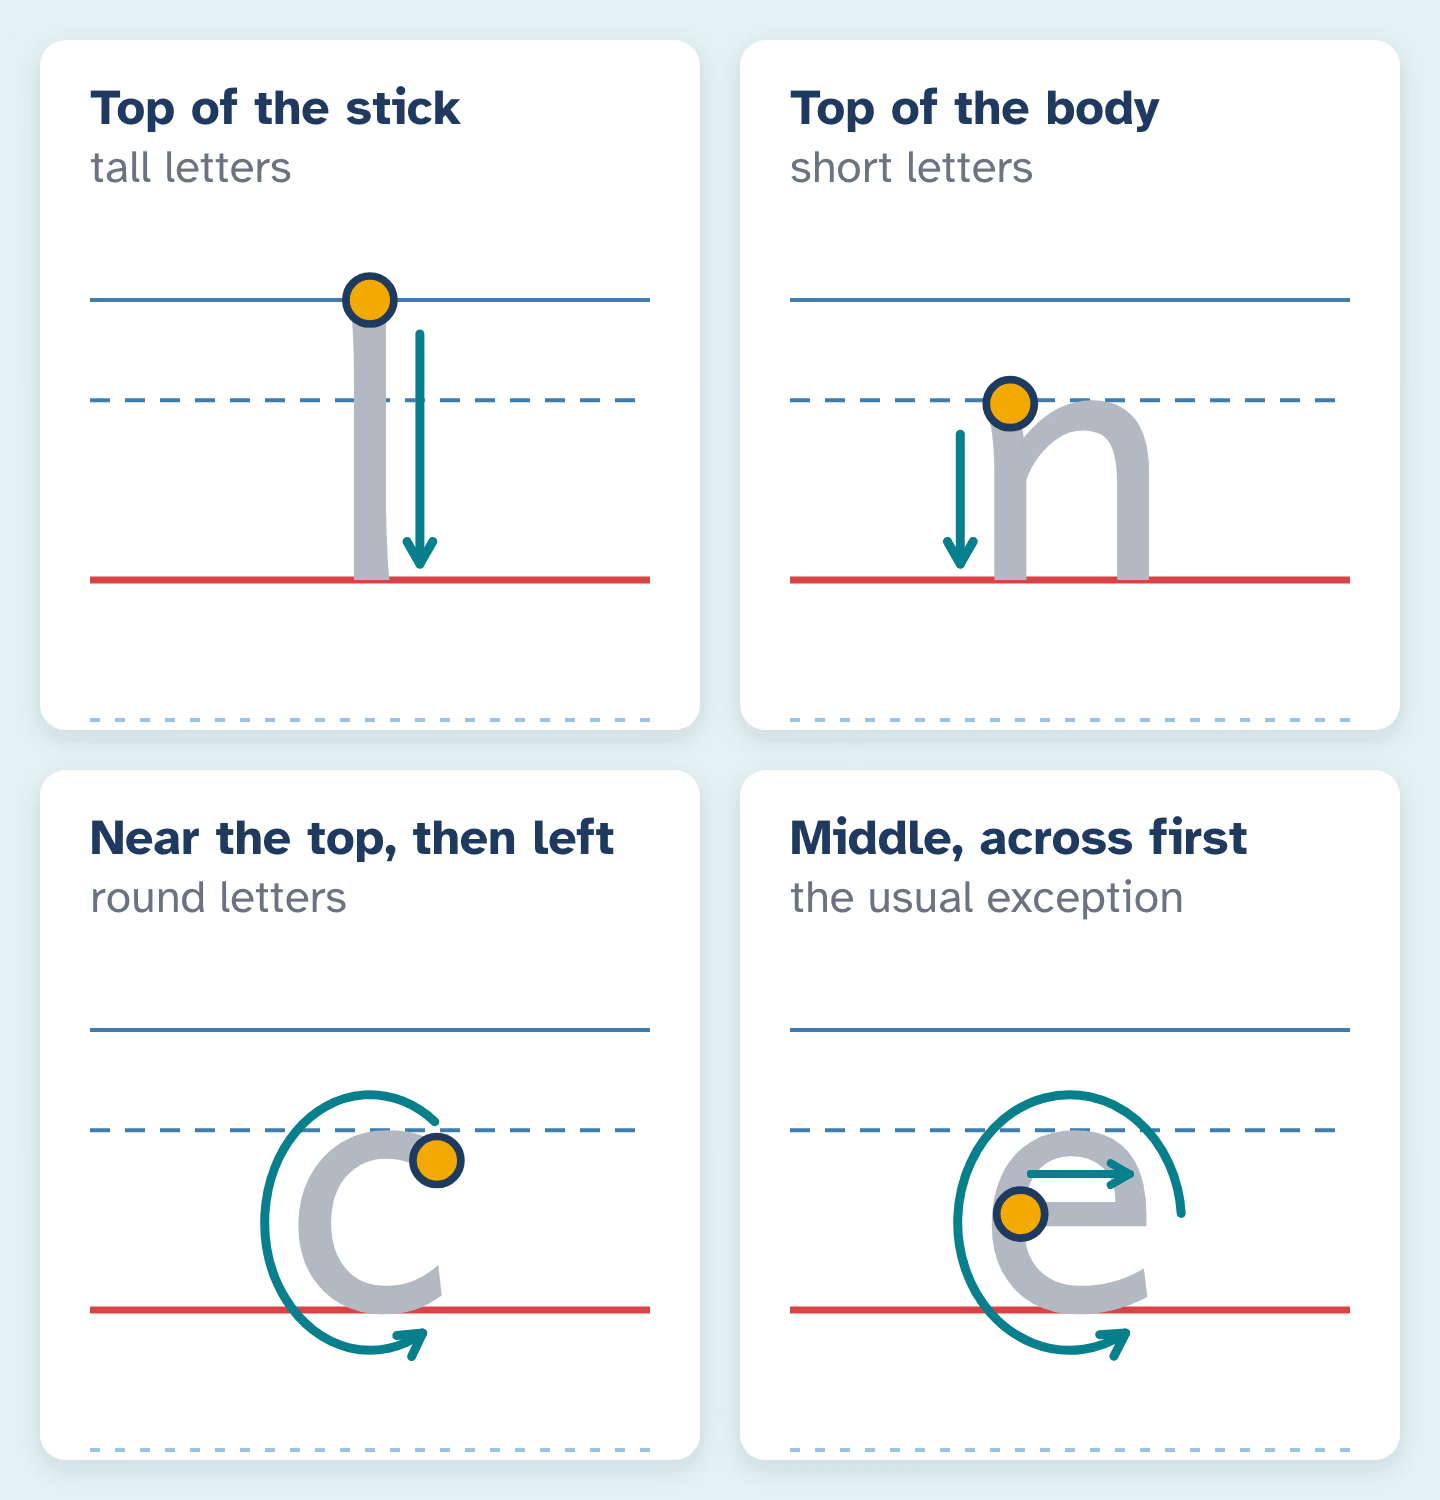
- Where to start. In print styles most letters start at the top, either at the top of a tall stick or at the top of the letter’s body. The usual exception is e, which starts in the middle with a short line across.
- Which way to go. Straight strokes go down before they go up. Round letters such as c, a, o, d, g and q start near the top and travel anticlockwise, around to the left, the way a c does.
- Where to stop. The finishing point matters more than it seems, because it is where a join will leave from once your child learns to join letters. In UK pre-cursive styles, many letters already end with a small exit flick.
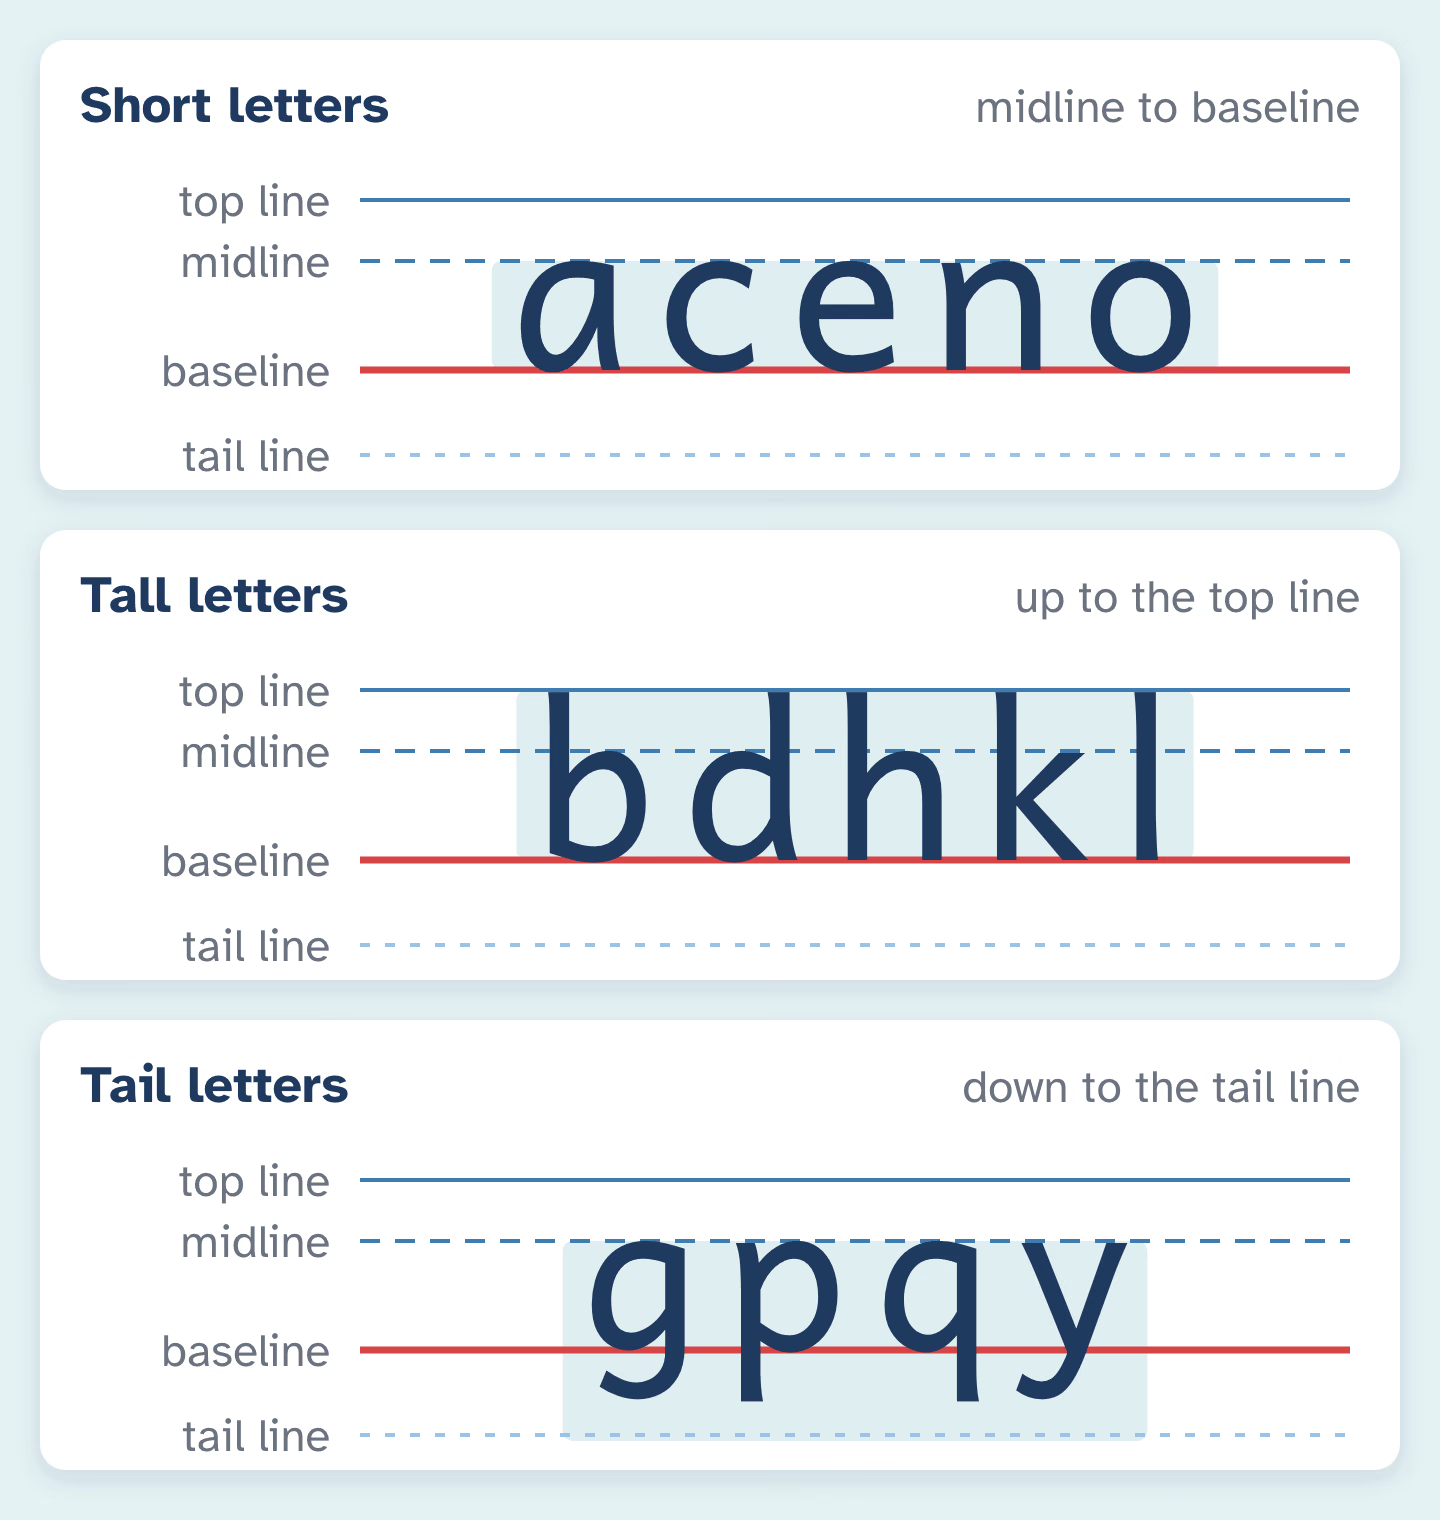
Then comes size and position. The NSW guide describes tall letters, short letters and letters with a tail that hangs below the line. On a four-line sheet that means short letters sit between the dashed midline and the baseline, tall letters reach up to the top line, and tails drop to the tail line. Our guide to handwriting lines explains how to talk children through them.
A teaching sequence for letter formation
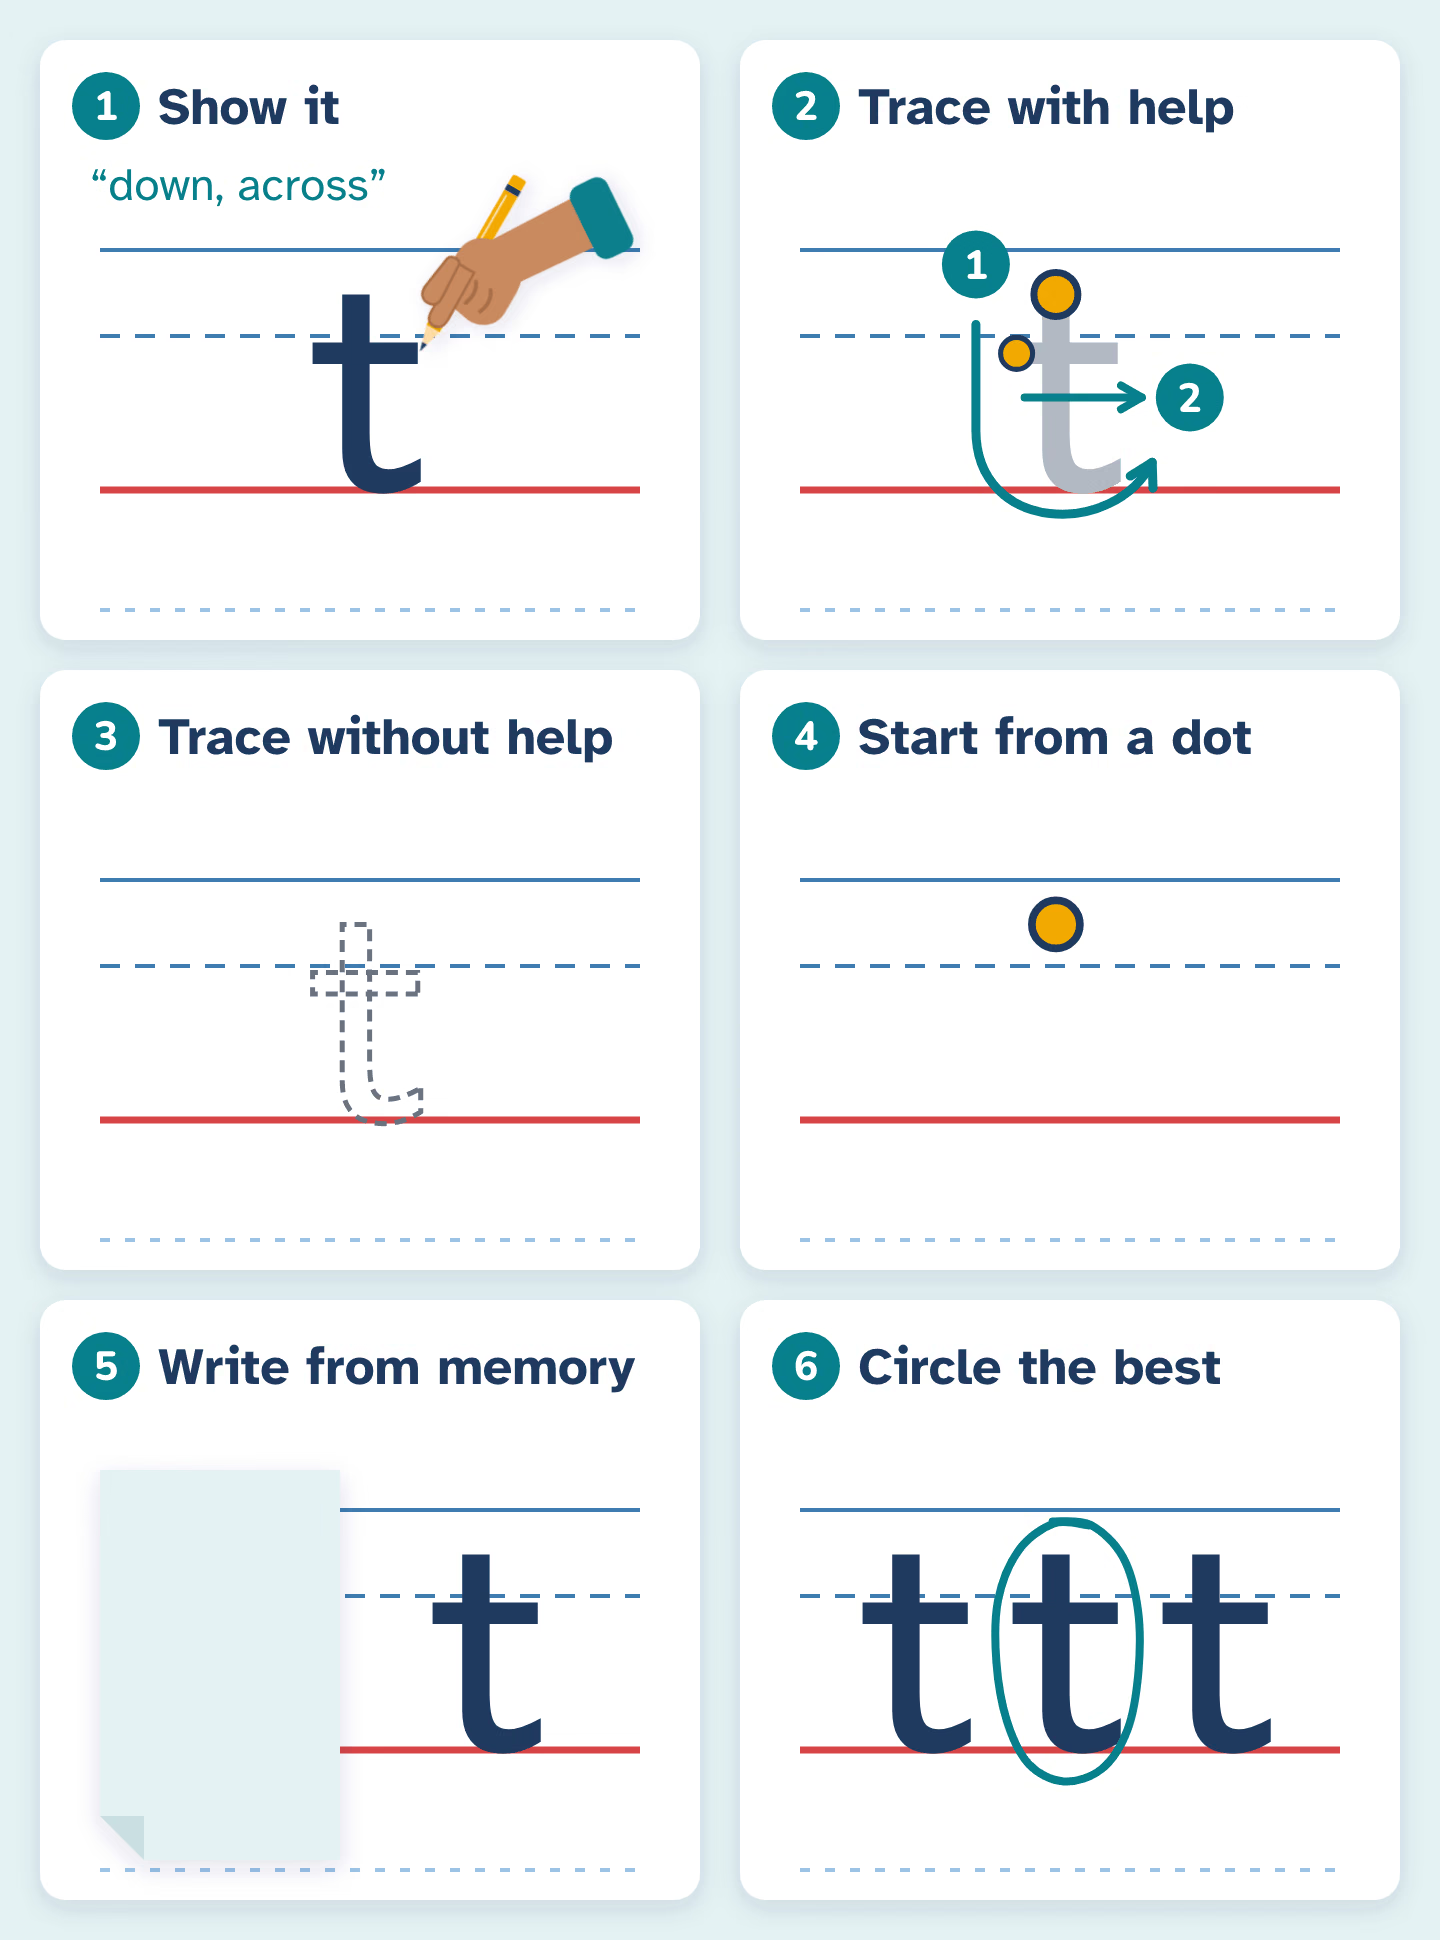
Graham describes a first-grade program in which each new letter is modelled by the teacher, traced with and without numbered arrows, written inside an outline and then written on plain lines. The NSW guide sets out a similar ladder, moving from a highlighted letter with a starting dot to a starting dot on its own. Put together, the steps look like this.
- Show it. Write the letter large while your child watches, saying the movement in a few words.
- Trace it with help. Your child traces a model that shows the starting point and the direction, with a dot and an arrow or numbered strokes.
- Trace it without help. A grey or dotted outline, with no arrows.
- Write it from a starting dot. Just a dot on the line, and the rest is up to them.
- Write it from memory. Cover the model, say the letter’s name and ask for it.
- Choose the best one. Ask your child to circle their best letter. It makes them look closely at their own work.
Practise from memory, in short rounds
The memory step is the one people skip, and it is the one that counts. Graham reports that in a study of first graders at risk of handwriting problems, studying a model marked with numbered arrows and then writing the letter from memory gave the best results.
Keep each round short. Graham advises against “massed practice”, where a child writes the same letter over and over in one sitting. A few careful tries, a look at which one is best, then a return to the letter over the following days works better. A sheet with an example row, a few tracing rows and a few blank rows is plenty for one sitting, which is how the letter tracing sheets in your school’s handwriting style are laid out. Switch on dotted-outline letters for the tracing step.
What to say while you model a letter
The NSW guide suggests a short phrase for each letter, quick enough to say in the time it takes to write it. Short is the point. Its examples include:
- t: “down, across”
- a: “around, up, down”
- p: “down, up, around and back”
The same idea works for any letter. A few of our own:
- n: “down, back up and over”
- o: “start at the top, around to the left, all the way back”
- e: “across, then around like c”
Use the same words every time, and if the school has its own phrases, use theirs. One caution from the research: Graham notes that asking children to say every step aloud while they are learning a letter did not help, probably because it uses up the limited working memory they need for the movement itself. So you say the cue while you model. When your child practises, have them say just the letter’s name. Graham points out that a letter’s name is likely to act as a cue for recalling how to write it, which is one reason quick letter naming matters.
Group letters that move the same way
England’s curriculum expects Year 1 pupils to understand which letters belong to which handwriting “families”, meaning letters formed in similar ways, and to practise them together. Teaching this way lets one movement carry over to several letters. Groupings differ a little between programs, but they usually look something like this:
- Straight down: l, i, t
- Round letters that start like c: c, a, d, g, o, q
- Down, back up and over: n, m, h, r, b, p
- Slanting lines: v, w, x, y, z
Graham’s program grouped letters by how they are formed, how often they appear in children’s writing and how easy they are to make, and it deliberately kept easily confused pairs such as b and d, or u and n, in different units. Notice that b and d end up in different families above: b starts with a tall stick, d starts like c. That difference in the starting movement is one of the best defences against b and d reversals. There is more on choosing groups and an order in our guide to teaching letters in families.
Letter formation at different ages
Children vary a lot, so treat these as rough markers rather than deadlines.
- Three to four: lines, circles and crosses come before letters. Some children write a letter or two from their name. If yours is keen, show the correct way to make those letters, but there is no need to push. Our guide to pre-writing shapes covers this stage.
- Around five (Kindergarten, Prep, Foundation or Reception): the CDC lists “writes some letters in her name” among the milestones most children reach by five. Formal teaching of letter formation usually starts in this first year of school.
- Year 1 or first grade: in England, the expectation is lowercase letters formed in the right direction, capital letters, and the digits 0 to 9.
- Year 2 or second grade: attention shifts to letters of the right size relative to each other, consistent spacing and, in schools that join early, the first joining strokes.
Graham recommends that from kindergarten to grade 3 handwriting is taught in short sessions several times a week or daily, adding up to about 50 to 100 minutes a week. At home, five or ten focused minutes is enough.
Fixing a letter that’s made the wrong way
You can’t see formation from the finished letter, so sit beside your child and watch a line of writing. When you spot a letter going the wrong way, try this:
- Fix one letter at a time. Start with the one they use most, often a letter in their name.
- Go back a step in the sequence. Model it again, then trace with a starting dot and arrow before moving to memory.
- Mark the start. The Royal Children’s Hospital in Melbourne suggests drawing a dot to show where the letter begins. A green dot for “go” is easy to remember.
- Highlight the slip. In Graham’s program the teacher marks a mistake with a highlighter and the child corrects it by tracing over the highlighted mark.
- Praise the specific thing. “You started your d like a c. That’s it.” Children repeat what you notice.
Expect old habits to come back when your child is tired, rushing or excited about a story. That is normal, and a quick reminder is enough. Graham also notes that children eventually develop their own handwriting style, so the aim is efficient and legible letters, not a perfect copy of the model. The Royal Children’s Hospital sheet adds that some left-handed writers form a few capital letters differently, which is fine. Our guide for left-handed writers has more.
If many letters are still formed incorrectly after steady teaching, or writing is slow, tiring or painful, talk to the class teacher. An occupational therapist can assess what is getting in the way.
Questions about letter formation
Should my child learn capital or lowercase letters first?
Most of what children read and write is lowercase, so lowercase letters need careful teaching. Capitals still need correct formation for names and the start of sentences. Graham notes that most children start school already able to write some letters, and that is easy to build on. Our guide to capital or lowercase first goes into it.
Does it matter which handwriting style we use at home?
Yes. Letter shapes, starting points and exit strokes differ between styles, so practise in the style your child’s school teaches. Our guide to handwriting styles helps you work out which one that is. NeatPencil’s fonts are modelled on each school style; apart from New Zealand’s, they aren’t official department fonts.
Is tracing enough on its own?
No. Tracing is a useful middle step for learning the path of a letter, but children also need to copy it and then write it from memory. We look at this in do tracing worksheets help.
My child writes letters correctly at school but not at home. Why?
At school there are models on the wall and regular reminders. At home children often write quickly and for fun. Keep a small alphabet strip in your school’s style where they write, and give a quiet reminder rather than a correction mid-story.
Sources
- Steve Graham, “Want to Improve Children’s Writing? Don’t Neglect Their Handwriting”, American Educator, Winter 2009–2010
- Department for Education, National curriculum in England: English programmes of study
- NSW Department of Education, Handwriting in the early years
- Royal Children’s Hospital Melbourne, Occupational Therapy: Prewriting skills and activity ideas
- Centers for Disease Control and Prevention, Milestones by 5 years


